

From More Than a Rock: Essays on Art, Creativity, Photography, Nature, and Life by Guy Tal:
“I’m actively working on a number of themes these days. Some involve a specific subject matter, others result from a fascination with specific locations… and some that at this time can only be described as abstract or immature concepts….
“I realized that I need a new word to describe these ongoing efforts and decided on ‘explorations.’ An exploration is sparked by a desire to understand something, to learn about it, to spend time with it, to tell its story (or mine) without defining a specific outcome in advance. Like a project, I know it will often result in something useful (images, portfolios, books, ideas, personal satisfaction, etc.), but until I know what it is, I find ample and sustained reward in merely being engaged in something that interests and fascinates me: a journey that is more important than any preconceived destination.”
From Lilies by Naomi Slade:
“With legions of yellow and orange lilies available, the dedicated lily lover might consider themselves well served by both plant and colour.”
Hello!
If you’ve come around here now and then, you’ve seen that I often use Lightroom brushes on my photos to paint the backgrounds black as a way of accentuating each image’s main subject. I usually do that as an after-thought; that is, when I’m working through my images in post-processing, I decide that the background is a distraction and opt to get rid of it — sometimes partially, most of the time entirely. There are, of course, different ways to create dark backgrounds when shooting; but many of them aren’t really suitable for outdoor photography using natural light… especially for a shooter like me who likes to take only one lens on each shoot, and leave my flash gear or other supplemental lighting at home.
While working on the white lily photos I featured in two previous posts (see White Lilies (1 of 2) and White Lilies (2 of 2), though, I started wondering if I would have taken the photos differently if I was shooting them with the intention of removing the backgrounds afterward in Lightroom. Would I, for example, use different camera settings? think of lighting in a different way? compose the subjects differently?
To produce pitch-black backgrounds in Lightroom, I reuse a brush preset I created with these settings…

… which will change all brushed areas in the image to their darkest possible values, with saturation and noise set as shown to blur and soften any blips of light or color that still want to peek through the darkened background elements. After completing a “first draft” on a set of photos — adjusting exposure and colors, removing spots, and sometimes cropping — I use a Lightroom brush to outline around the edges of the subject like this:
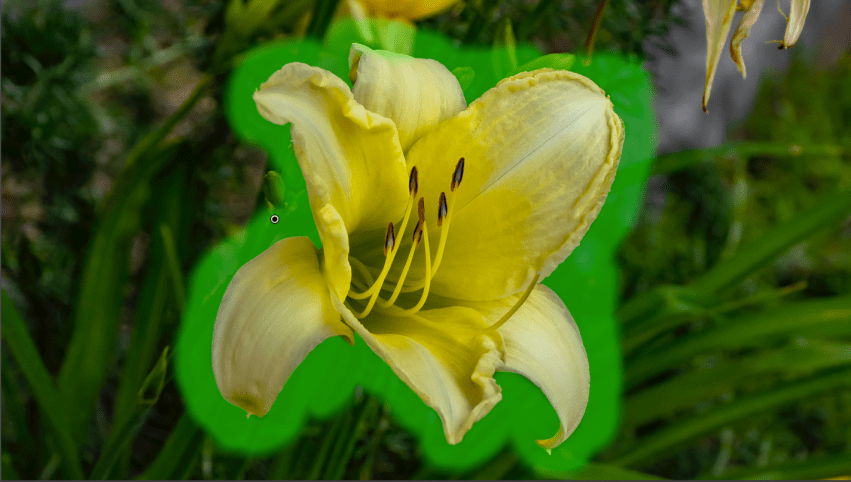
The outline brush is feathered — as you can see above from the soft edges of the fluorescent green masking — since the shape of the subject varies throughout and its boundaries consist of curved lines and contours. Think of this like painting a wall where there is floor molding of a different color: one of the first things you might do is pick a small brush of suitable size (and bristle density) to paint a thin line of the wall color just above the molding. If you use a brush that’s too large, you’ll likely slop paint onto the molding you’re trying to protect, and have to remove it. If I zoom into a section of the photo I’m working on, you can see something similar near the top of the bloom…

… where the green mask covers part of the petal. I remove that with Lightroom’s Erase brush, and zoom in along all the edges of the flower to remove the mask from any other areas where it’s bled onto the subject.
I then use the same sized brush but without feathering to outline the subject one more time…

… and finally use a larger brush — also without feathering — to paint the rest of the background, effectively converting it to all-black. Turning off the feathering for these last two steps is like using a wider paintbrush in our wall-painting metaphor: you can cover a larger area quickly with more paint and fewer strokes (or mouse movements!).

Here’s the transition through the three steps, first with the mask showing and then with the mask turned off. Turning the mask off and on repeatedly as I apply it lets me see my progress and make sure that I’ve covered everything behind the flower.


The most time-consuming part of this workflow is the first step — outlining the subject with the feathered brush — so I tackle that right off the bat and then finish the rest of the background like a guy slinging finger-paint on poster paper. I’ve experimented a little with doing the same thing in Photoshop instead of Lightroom; and while it’s sometimes easier to mask the subject then flip the background black in Photoshop — the most detailed masking in Photoshop or Lightroom seem to require about the same amount of effort. So I stick with Lightroom, and don’t have to add Photoshop to my workflow to get these results.
With all this in mind, I altered how I took the photos for this series of posts to allow for what I’ve learned about making it easier and more accurate to convert their backgrounds to all-black. Selecting and masking around the subject works best when it’s as in-focus as possible, with good contrast and sharpness between the foreground and background. Since the amount of light and color that reaches the camera’s sensor is determined by a combination of aperture, shutter speed, and ISO settings — the exposure triangle — I wanted to figure out if different exposure settings would improve my ability to remove the backgrounds.
So I started with an assumption that a higher ISO setting would give me more flexibility in choosing shutter speed and aperture, and experimented with ISOs in the range of 800 to 3200 to see what worked best. ISO 3200 introduced a bit too much grain into the photos; and while I could remove a lot of it in Lightroom, the images ended out softer than I wanted with porous edges around the subject that were difficult to mask. ISO 800 or 1600 provided a good balance between sharpness and grain, so I took about half of the photos at ISO 800 and half at ISO 1600. Either setting gave me what I wanted: a few extra stops of available light with an aperture setting that increased depth of field so that the flower blossoms were well-focused from front to back. Shutter speed settings didn’t matter that much; I only needed a high enough shutter speed to eliminate camera shake and stop the flowers from dancing in a light summer breeze. Any shutter speed greater than 100 worked good enough.
I took all of the photos with the same lens — a Sony 18-250mm zoom lens — whose great advantage is that (though it’s not technically a macro lens) I can get as close as 18 inches from a subject, and get decent focus even when zoomed to 250 millimeters. This lens works well at Oakland cemetery’s gardens since many of the planted areas are set two or three feet above ground level, or the flowers are blooming where I can’t get close enough to use a macro lens. Finally, since I was going to remove the backgrounds anyway, I could take the photographs from different angles, and could disregard random plants, trees, sticks, or stones that might distract from the subject.
There will be about 100 photos in this project, which is why this post is “1 of 10”. Over the past few weeks, I’ve tried to take a few pictures of ever lily variety I could find at the gardens and ended out with photos of a couple dozen different kinds — colors ranging from yellow to orange, pink to red, and magenta to purple. As I overheard someone telling her friends as they passed me hunched over a batch of lilies: “There’s so many flowers here! It’s like going to the botanical garden, but it’s free!”
🙂
If you read this far: bless you! Below are the first ten photos; more soon!


